While the touch-friendly interface on Chromebooks offers an intuitive gateway to navigating apps, scribbling notes, or even playing games, there are times when you need more granular control over this feature. Perhaps accidental touches during intense typing sessions are driving you mad, you prefer the precision of a mouse and keyboard, or you simply want to extend your battery life by disabling an active component. Whatever your reason, mastering the advanced methods to control Chromebook touch functionality can significantly enhance your workflow and user experience.
This guide dives deep into the various strategies, from everyday settings adjustments to more technical flag manipulations and terminal commands, empowering you to manage your touchscreen with confidence and precision.
At a Glance: Your Options for Touch Control
- Settings Menu: The most stable and straightforward way to permanently disable or enable your touchscreen. Ideal for consistent preferences.
- Keyboard Shortcut (via Chrome Flag): Offers a quick, temporary toggle, perfect for switching touch on/off as needed. Requires enabling an experimental flag.
- Developer Mode & Terminal: Provides ultimate control for advanced users, but comes with significant risks like data loss and warranty implications.
- Physical Barriers: Non-technical, temporary solutions like screen protectors that physically block touch input.
Why Take Control? The Motivations Behind Disabling Your Touchscreen
The convenience of a touchscreen is undeniable, particularly for tasks like drawing, using certain Android applications, or quick navigation. Yet, an always-on touchscreen isn't always ideal. You might find yourself needing to disable it for several compelling reasons:
- Minimizing Distractions & Accidental Triggers: Ever been typing furiously, only for your palm or a stray finger to register an unintended click or scroll? Disabling the touchscreen eliminates these frustrating interruptions, allowing you to focus on your work.
- Preference for Traditional Input: Many users simply prefer the tactile feedback and precision of a physical keyboard and mouse or trackpad. Turning off touch ensures you stick to your preferred input methods without accidental diversions.
- Enhancing Battery Life: While perhaps a minor gain, disabling components like the touchscreen can contribute to marginal battery savings over time, especially if you rarely use it.
- Maintaining Screen Cleanliness: Less touching means fewer smudges and fingerprints, keeping your display pristine for longer.
- Troubleshooting Erratic Behavior: Sometimes, an unresponsive or erratically behaving touchscreen isn't a hardware issue but a software glitch. Temporarily disabling and re-enabling it can often resolve these anomalies.
- Preventing Damage: In certain environments or when children are using the device, disabling touch can prevent unintended interactions or even reduce wear and tear.
Whether you're looking for a permanent solution or a quick toggle, understanding the various methods ensures you're never at the mercy of an unwanted touch input. For a general overview of how to turn off touch on your device, you might find our guide on how to disable Chromebook touch quite helpful.
Method 1: The Everyday Control – Chromebook Settings (Stable & Reversible)
For most users seeking a reliable and straightforward way to manage their touchscreen, the Chromebook's built-in settings are your first and best port of call. This method is stable, doesn't require experimental flags or developer mode, and is easily reversible.
Disabling Touch via Display Settings
This path is typically the most direct for managing screen-related features.
- Access Your System Tray: Click on the clock icon located in the bottom-right corner of your Chromebook's screen. This opens the system tray, revealing quick settings and notifications.
- Open Settings: From the system tray, click the gear-shaped "Settings" icon. This will launch the main Chromebook settings window.
- Navigate to Display Settings: In the left-hand navigation pane, scroll down and click on "Device." Then, from the options that appear, select "Displays."
- Toggle Touchscreen Off: Within the Displays section, you should see an option labeled "Touchscreen." Simply click the toggle switch next to it to turn it "off." A brief on-screen notification might confirm the change.
Disabling Touch via Accessibility Settings (Alternative Path)
Some Chromebook models or Chrome OS versions might place this option under Accessibility features. If you don't find it directly under "Displays," check here.
- Access Your System Tray & Settings: Follow steps 1 and 2 from the previous method to open your Chromebook settings.
- Navigate to Accessibility: In the left-hand navigation pane, scroll down and click on "Advanced." Then, select "Accessibility."
- Manage Accessibility Features: Click on "Manage accessibility features." This will open a new window with a comprehensive list of accessibility options.
- Locate and Toggle Touchscreen: Scroll down until you find the "Input" section. Within this section, look for an option related to "Touchscreen" or "Enable touch input" and toggle the switch to "off."
Important Note: The exact wording and placement of these settings can vary slightly depending on your specific Chromebook model and the version of Chrome OS you are running. If you don't immediately find the option, take a moment to explore the "Device" and "Accessibility" sections thoroughly.
Method 2: The Quick Toggle – Keyboard Shortcut (Flag-Dependent)
Imagine needing to quickly disable your touchscreen for a moment, then instantly re-enable it. This method provides precisely that agility, but it comes with a prerequisite: enabling an experimental Chrome Flag. Think of it as a hidden feature, unlocked only if you know where to look.
Enabling the Shortcut Functionality: Diving into Chrome Flags
Chrome Flags are experimental features that Google is testing. They offer a peek into future functionalities but aren't always stable and can change or disappear without notice. Proceed with a clear understanding that you're venturing into experimental territory.
- Open Chrome Flags: Launch your Chrome browser and type
chrome://flagsinto the address bar, then press Enter. This will take you to the "Experiments" page. - Search for the Flag: In the search bar at the top of the Chrome Flags page, type "debugging keyboard shortcuts" or specifically search for
#ash-debug-shortcuts. - Enable the Flag: Once you find the "Debugging keyboard shortcuts" flag, click the dropdown menu next to it (it's usually set to "Default") and change it to "Enabled."
- Restart Your Chromebook: A prompt will appear at the bottom-right of your screen, asking you to restart your Chromebook. Click "Restart" to apply the changes. Your device needs to reboot for the flag to take effect.
Warning: Chrome Flags are experimental. Enabling them can lead to unexpected behavior, system instability, or even data loss in rare cases. They may also reset to default after a major Chrome OS update, requiring you to re-enable them. Only proceed if you're comfortable with these potential risks.
Using the Shortcut: Your On-Demand Touch Control
Once the "Debugging keyboard shortcuts" flag is enabled and your Chromebook has restarted, you're ready to use the quick toggle.
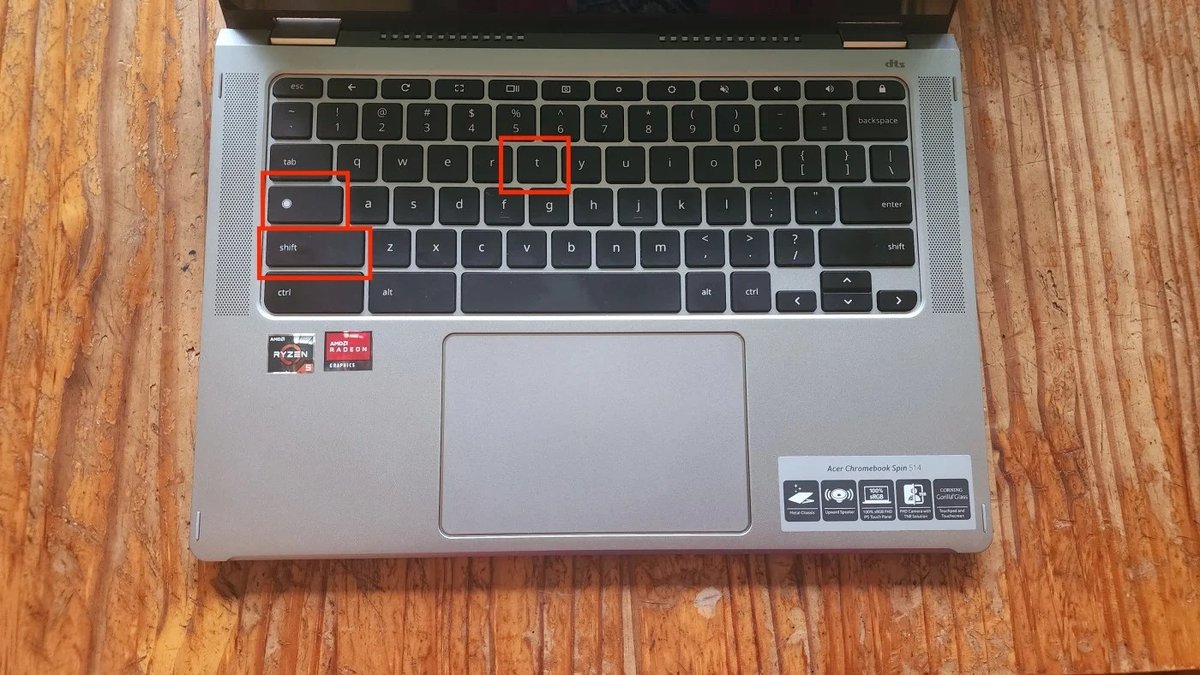
- To Disable/Enable: Simultaneously press the Search key (the magnifying glass or Chromebook logo key) + Shift key + T key.
Each press of this combination will toggle your touchscreen's status. A small notification will briefly appear on your screen, confirming whether the "Touchpad debugging" (or similar wording) is enabled or disabled. When it states "Touchpad debugging enabled," your touchscreen is disabled. When it states "Touchpad debugging disabled," your touchscreen is enabled. It’s a bit counter-intuitive, but effective.
This method is incredibly convenient for those who frequently switch between touch and traditional input. You might appreciate how easily you can switch back and forth, offering a similar flexibility to how you might manage Chromebook right-click options for a specific task.
Method 3: The Deep Dive – Developer Mode & Terminal Commands (Expert Territory)
This method offers the most comprehensive control over individual input devices, including your touchscreen. However, it is highly discouraged for most users due to its complexity and the significant risks involved. Entering Developer Mode requires a complete device wipe (Powerwash), which means all local data will be erased. Furthermore, Developer Mode can potentially void your warranty or bypass organizational security policies.
Consider this method only if you are an experienced user, fully understand the implications, and have exhausted all other options.
Preparing for Developer Mode: The Powerwash Warning
Before you even think about this method, back up all your important data from local storage to Google Drive or an external drive. Entering Developer Mode will erase everything.
- Enter Recovery Mode: Power off your Chromebook. Then, press and hold the Esc + Refresh (circular arrow) + Power buttons simultaneously.
- Access Developer Mode: When you see the "Chrome OS is missing or damaged" screen (or similar), press Ctrl + D. You'll be asked to confirm that you want to turn OS verification off, which enables Developer Mode. This is where the Powerwash occurs.
- Wait for Transition: Your Chromebook will go through a reboot process, which can take several minutes. Each startup in Developer Mode will initially display a warning screen; press Ctrl + D or wait for it to automatically boot.
Executing Commands in Crosh: Precision Disabling
Once in Developer Mode, you can access the Crosh terminal, a command-line interface for Chrome OS.
- Open Crosh Terminal: Press Ctrl + Alt + T to open the Crosh terminal.
- Enter Shell: Type
shelland press Enter. This will give you access to a broader set of Linux commands. - List Input Devices: Type
xinput listand press Enter. This command will display a list of all detected input devices connected to your Chromebook, along with their unique device IDs. - Identify Touchscreen ID: Carefully examine the list for an entry that clearly identifies your touchscreen. It might be labeled "Atmel maXTouch Touchscreen," "ELAN Touchscreen," or something similar. Note down the numerical "id" associated with your touchscreen device.
- Disable the Touchscreen: Once you have the correct ID, type the following command, replacing
[ID]with your touchscreen's actual ID:xinput disable [ID]
For example, if your touchscreen ID is 9, you would typexinput disable 9. Press Enter. Your touchscreen should immediately stop responding. - Re-enable the Touchscreen (if needed): To re-enable it, use the same ID with the
enablecommand:xinput enable [ID]
Reiteration of Warnings: This method is highly technical and should only be attempted by users who are confident in command-line environments. It's a permanent change until reversed via command or a Powerwash. Regularly entering Developer Mode and switching back can be cumbersome and risks data loss. Remember, Developer Mode itself can make your Chromebook less secure.
Method 4: The Physical Barrier – Non-Technical Alternatives (Temporary Fixes)
Sometimes, the simplest solution is a physical one. If you're looking for a temporary, non-software-based way to prevent touch input, or you're uncomfortable with software modifications, these options might suffice.
- Thick, Non-Conductive Screen Protector: Applying a very thick, non-conductive screen protector can effectively dampen or block touch signals. While this might prevent accidental touches, it can also impact screen clarity and responsiveness even when touch is desired.
- Temporary Overlay: Crafting a temporary overlay from a non-conductive material (like cardboard or a thin plastic sheet) that clips onto your screen's bezel can physically block touch. This is a very crude but effective method for very short-term needs.
- Protective Case with Touch-Blocking Features: Some specialized Chromebook cases or covers are designed with an integrated flap or overlay that can be positioned over the screen to prevent touch input. These are typically designed for robust protection, with touch blocking as an added benefit.
Limitations: These physical methods are generally not ideal for long-term use. They can obstruct your view, potentially scratch the screen if not applied carefully, and may not fully block all touch registration depending on the material and pressure. They also don't offer the software-level precision of the other methods.
Bringing It Back: Re-Enabling Your Chromebook's Touchscreen
What goes off must come back on, right? Re-enabling your touchscreen is just as straightforward as disabling it, provided you remember which method you used.
- From Settings: If you disabled the touchscreen via the Chromebook Settings, simply navigate back to either "Device > Displays" or "Advanced > Accessibility > Manage accessibility features" (depending on where you found it). Locate the "Touchscreen" toggle and switch it back to "On."
- From Keyboard Shortcut (Search + Shift + T): If you used the keyboard shortcut (which relies on the Chrome Flag), simply press Search + Shift + T again. This will toggle the touchscreen back to an enabled state. If, for some reason, the flag was reset (e.g., after a major Chrome OS update), you might need to go back to
chrome://flags, re-enable "Debugging keyboard shortcuts," and restart your Chromebook before the shortcut works again. - From Terminal (Developer Mode): If you disabled the touchscreen using the
xinput disable [ID]command in the Crosh shell, you'll need to open the Crosh terminal again (Ctrl + Alt + T, then typeshell). Then, use the commandxinput enable [ID], replacing[ID]with the specific device ID you noted earlier for your touchscreen.
When Things Go Awry: Troubleshooting Common Touchscreen Issues
Even with the best intentions, you might encounter unexpected behavior. Here's how to address some common troubleshooting scenarios related to your Chromebook's touchscreen.
- "I can't find the touch screen option in settings!"
- Verify Touchscreen Support: First, double-check if your specific Chromebook model actually has a touchscreen. Not all Chromebooks are touch-enabled. A quick search for your model number online will confirm this.
- Check Chrome OS Version: Ensure your Chrome OS is up to date. Older versions or very new beta versions might have different settings paths.
- "My touchscreen is inconsistent or unresponsive after disabling/re-enabling."
- Restart Your Chromebook: A simple restart can often resolve minor software glitches.
- Check for Pending Updates: Go to Settings > About Chrome OS > Check for updates. An update might fix underlying issues.
- Perform a Powerwash: As a last resort, a factory reset (Powerwash) can clear deep-seated software issues, but remember this will erase all local data. Back up everything first!
- "The touchscreen remains active even after I disabled it."
- Disconnect Peripherals: Ensure no external touch-sensitive accessories (like certain drawing tablets or touch monitors) are connected and interfering.
- Re-check the Setting/Flag: Double-verify that the setting toggle or the Chrome Flag is indeed set to "off" or "disabled." Sometimes, a quick visual check can catch a missed step.
- "None of these methods work, and my touchscreen still isn't behaving."
- Hardware Malfunction: If all software-based solutions fail, it's possible you're dealing with a hardware issue. In this case, contact your Chromebook's manufacturer support for further diagnostics or repair. This might be a scenario where your device needs more than just a software tweak, similar to when you might need to troubleshoot a Chromebook battery not charging.
Choosing Your Path: Which Method is Right for You?
Selecting the right method to control your Chromebook's touch functionality depends entirely on your needs and comfort level.
- For Occasional, Quick Toggles: The Keyboard Shortcut (via Chrome Flag) is your best bet. It offers unparalleled flexibility for users who frequently switch between touch and non-touch modes, like when you’re annotating a document versus writing an essay.
- For Permanent or Consistent Disabling: The Chromebook Settings method is the most stable and recommended approach. It’s perfect if you rarely or never use the touchscreen and want it off all the time.
- For Troubleshooting or Testing: Start with the Keyboard Shortcut if you suspect software issues. It's easily reversible and low-risk.
- For Advanced, Granular Control (and you're an expert): Only consider Developer Mode and Terminal Commands if you possess significant technical expertise and understand the inherent risks, including data loss and potential warranty voiding. This path grants the most specific control over individual hardware components.
- For Simple, Physical Prevention: Non-technical alternatives like screen overlays are a quick fix but generally not recommended for a seamless user experience.
Key Considerations Before You Act: - Always Test Reversible Methods First: Before committing to a permanent change or diving into Developer Mode, experiment with the Settings or Keyboard Shortcut methods to ensure disabling the touchscreen truly meets your needs.
- Data Backup is Crucial: Especially if considering Developer Mode, backing up all your data is non-negotiable. A Powerwash means wiping everything.
- Stay Updated: Keep your Chrome OS updated. Google regularly rolls out new features and bug fixes, which can sometimes change the paths to settings or even the availability of certain Chrome Flags. An update can also bring new ways to manage Chromebook print settings or other system features.
Staying Current: The Role of Chrome OS Updates
Chrome OS is an ever-evolving operating system. This means that paths to settings, the availability of certain Chrome Flags, and even the exact wording of options can change over time. What works today might be slightly different after a major system update. For instance, the way you manage Chromebook split-screen functionality or other display settings might evolve. Always ensure your device is updated to the latest stable version of Chrome OS to access the most current settings and features. If you encounter discrepancies, first check for pending system updates.
Final Thoughts: Mastering Your Chromebook Experience
Empowering yourself with advanced methods to control your Chromebook's touch functionality isn't just about turning a feature on or off; it's about tailoring your device to your precise needs. Whether you're a writer seeking distraction-free typing, an artist preferring stylus input, or simply someone who appreciates having full command over their technology, these techniques offer the precision and flexibility you deserve. Choose the method that aligns with your technical comfort and specific requirements, and reclaim ultimate control over your Chromebook experience.